Tuesday, December 29, 2009

Christmas Tags

Christmas tagsA couple of tags I made for some co-workers gifts... my new stamp was created with Memento Tuxedo Black ink and of course, Copics to color it in. Martha Stewart's Aspen Snowflake punch was used on the two top corners. A bit of red ribbon and these were done!

Christmas TagI love this adorable bear!

Wednesday, December 23, 2009

Christmas Cards 2009

This year I used new techniques thanks to recent purchases: One, I used my new Cuttlebug to emboss and die cut the front of the card, as well as die-cutting the red Bazzil mat. I love it! The snowflake embossing folder was wonderful and so easy to use.

I also used my new Martha Stewart border punch Aspen Snowflake for the front of the card, and used the larger matching snowflake punch to make the embellishment on the "Let It Snow" tag.

Of course, I used Copics to colour in all 30 stamped images (Penny Black stamp).

Stickles on the tag, ribbon slipped through and glued down, and with a bit of patterned paper (Peppermint Twist by K and Company) and these were done!


Happy Holidays everyone!

Thursday, December 10, 2009

Copic Snowman

Marianne Walker over at I Like Markers kindly offered her readers a very cute Holiday drawing for anyone to download and colour in with their Copics.

Here is my version:


If you want to learn all about using Copics, I would highly recommend Marianne's site; she has years of tutorials from beginners to advanced users!

Wednesday, November 25, 2009

More Copic Colouring

Anime GirlMore practice with my Copics... this one was an image I purchased from 123RF and tweaked a tad. I changed her hair, shirt, jacket, added details and changed what she was holding (previously a honking huge gun!). I then removed the colouring so I could print it off and colour it in with my Copics.

Sunday, November 15, 2009

2 Copic Cards

2 Copic cardsSince I was asked to make two cards for co-workers, I took the oportunity to play, er, use my new Copic markers. ;)

I didn't just use them to colour in the stamped images; I also coloured some embellishments to ensure they matched! On the "For You" card, I used B97 in the flower, so I also chose it to color the tag, string and jewel. On the "Happy Birthday" card, instead of hunting down some matching cardstock to mat the stamped image, I simply punched white cardstock and then coloured the layers with E11 and E57, (which I used on the hedgehog).

Now I no longer have to sweat that I may not have the perfect colour ribbon, brad or other embellishment; because they are alcohol inks, my Copic markers will colour them all!

Wednesday, November 11, 2009

Copic Cats

I found these new stamps at Michael's the other day, and being a cat-lover, had to practice with a few shades and colours with my new Copics. I recorded the colours I used and keep these little sample images in a small artist's portfolio so I can refer to them later:


Saturday, November 7, 2009

First Copic Drawing

Copic Deer
My first real drawing with my new Copic pens... if you don't count a small cartoon Reindeer I coloured in for a greeting card.

I created it for my other blog I'd Rather Be Blogging to illustrate a close encounter I had with four does on the way to work early the other morning.

I started with a pencil drawing, outlined it in 0.3 black Multiliner, and coloured it in with E11, E21, E25, E29, E57 and E49. Shadows were coloured with W1, W5 and W7.

I'm still learning, but already am in love with using these markers!

Tuesday, November 3, 2009

A New Treat


Those darn enablers over at the 2Peas in a Bucket Scrapbooking site... after reading so many message board posts about something called "Copics", I came to discover the wonderful markers used by many artists. Unlike regular felt pens, these Japanese alcohol-based markers are fantastic for creating beautiful blended colours. Now many crafters are using them to colour in stamped images or drawings too.

They're not cheap and it takes practice to use them properly. So while on a business trip, I absorbed as many YouTube video demos as I could and read blog posts for tips and tricks. Then a few days later I purchased my first pens in what, I am sure, will be a moderate collection (the Sketch markers have over 300 colours).

So here's my first attempt - a reindeer to adorn a simple holiday card:

After more practice, I hope to do some real drawings of my very own using these new goodies too.

Thursday, October 22, 2009

My Redecorated Craftroom

A few weeks ago I repainted daughter's old green and purple bedroom; since she moved to a larger room downstairs last winter, I set this one up as a scrapbook / craft / art space. Now it finally looks more like it. New shelves, painted accessories, baskets and desk organizers were also added.

I love working in there; with, of course, a cat or three to around to keep me company.

More images can be found over at 2Peas here in a slideshow format.

Monday, October 5, 2009

Harley And Daisy

One of my most favorite blogs to visit is Daisy The Curly Cat. I love reading about Daisy and her "brother" Harley and their adventures in sunny Florida. Well, Daisy won my first-ever blog contest over at I'd Rather Be Blogging, so I sent her two sketches of my favorite cats (after my own, of course ;) ).


I do hope they like them!

Monday, September 28, 2009

Wedding Card


A lady at work got married over the summer, so some of the staff pooled our resources to give her a gift.

As usual, I was in charge of the card.

Here it is. I layered black cardstock on a white card, then chose a patterned black, grey and white paper over that. Two layers of ribbon were adhered to that, topped with a bow and heart brad to affix it.

On top of everything are four layers of frames for the plastic bird/heart embellishment. Every layer of white and black paper was also edged with silver ink for a touch of sparkle.

Inside I layered a black and white sentiment with simply "Congratulations" in script font.

I hope she likes it!


Thursday, September 17, 2009

Sympathy Card

Sympathy Card
A co-worker recently lost her great grandmother, so I was called upon to do a card.

Instead of the usual black-themed style, I found a very pretty card on Two Peas to inspire me to do this.

I got out my new Fiskar's embossing plates to rub a rose pattern on yellow Bazzil cardstock. I also used one of my new edge punches for the filagree cutouts (since they were 40% off, I picked up 4 different ones!). A rose stamp outlined with blue, a small piece of blue paper, and grey cardstock were layered, some sheer ribbon and a few self-stick rhinestones then added for a bit of bling.

I never seem to have the right stamp for sayings; so I just printed off the sentiment on my computer.

This one didn't take long; the most time-consuming part was embossing the yellow cardstock!


Thursday, September 10, 2009

Donald Duck Card

Donald Duck Birthday card
At work we get together for staff birthdays. Now this was fun when it was a small office... we'd get together every once and awhile to share some cake, or more recently, healthier options such as fruit. But since we've expanded and the staff has grown in size, it seems like we have a birthday every other week. Which is why some people prefer to not celebrate their special days. Well, that and the embarrassing ritual of the Off-Key-Singing.

One staff member and good friend always takes her holidays on her birthday. She also loves Donald Duck. So instead of a get together after she returned from vacation, we gave her flowers and a card (as usual, made my moi).

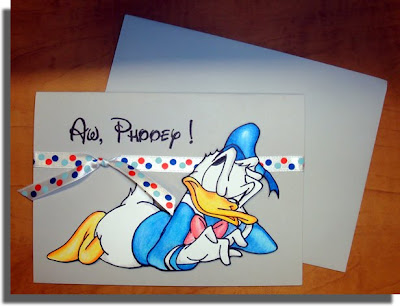
I hand drew this Donald, coloured in with pencil crayons, used Turpentine to smooth with a smudger, outlined in Sharpie and cut out. I mounted it on a card with foam squares to pop it out, found some matching ribbon, and hand-wrote the lettering copying the Walt Disney font I have loaded on my laptop.

Just a simple card, but I think she'll appreciate it (well, that and the Non-Off-Key-Singing).

Monday, September 7, 2009

Bird Watching


It's hard to draw cats when they won't sit still for long... so the other day when I was in our craft room and all three of them joined me, I pulled out my moleskine book and pencils.

This time Tawnee obliged me as she sat upon the shelf at the window.

Preoccupied with bird watching, at least she kept still long enough to pose.

For a little while at least.


Saturday, August 22, 2009

Mpressed With Marsha

A blog I have become a fan of recently not ony has inspired me with the blogger's wonderful artistic creations, but also with her flair for beautiful decor.

A post I especially loved at Marsha's Mpressions detailed renovations to her scrapbook room with rustic vintage pieces, including hanging a vintage printer's drawer on the wall to store wooden stamps.

So on our upcoming trip to the US, I made it a point to hit at least one antique shop to see what I could find to add to MY scrapbook room. Little did I know that minutes after walking into The Old Albertville Creamery in Albertville, Minnesota, I would look down to find the EXACT SAME PRINTER'S DRAWER!

I couldn't believe my luck. So now it hangs in my room, which has yet to be repainted... but at least I now can display my collection of wooden rubber stamps too!

Thank you Marsha!


Saturday, August 8, 2009

Open For Business


I've finally done something I was asked to do last year... yes, I DO procrastinate, don't I?

What did I do?

Well, I finally opened some shops at CafePress, creating some products with my original artwork on them.

I doubt I shall get any many sales, but that's okay. The main reason I wanted to try it is to create some items for myself, and perhaps a few trinkets for future bloggy giveaways.

I'm going to add more with older artwork and some of my photographs... so we'll see how it goes. You can window shop here:

MAUREEN'S GALLERIES AT CAFE PRESS


Monday, August 3, 2009

New Cutting Tool

The other day I was getting frustrated. I wanted to create a card with a see-through window in the middle of the front panel. However, my punches only allow me to cut a hole near the edge of a paper, so I ended up having to hand-cut (and badly, IMHO) a hole for the background image to peek through.

Then I came across this tool at Michael's... not in the scrapbooking section, where hole cutters can run nearly $ 37. I found this doohicky in the art section; for a mere $ 6. It has six spare blades (which are very sharp), and two pencil nibs for drawing instead of cutting, circles of various sizes.


So of course, I had to try it out:

And am most pleased with how it works! So let that be a lesson; you can find lots of things OUTSIDE the scrapbooking section too.


Wednesday, July 29, 2009

Using My New Stamps

While in the States a few weeks back, I splurged on a whole mess of new stamps. Since I do cards for work and family, I had to expand my collection of stamps (especially Happy Birthday ones).

To my delight, I found three sets of adorable Penny Black stamps at Archiver's at the Mall of America. Here are just a few of nearly two dozen I completed recently:

On this card, I used All Night Media's Clear Liquid Embossing over the balloons to give them a shiny raised texture.


Tuesday, July 28, 2009

Moleskine Sketches

A few weeks back, I finally got myself something I've wanted for awhile; a small pocket "Moleskine" and a set of good sketching pencils. I made a case to carry them in my purse, so I can draw wherever and whenever I please.

Here are two of my first drawings. I hope to fill the entire book one day!


My first sketch...

done in our living room while Sheba, our oldest cat slept on her favorite recliner.

When she woke up, she sat with me and I did a closeup of her beautiful green eye.


My second page, a sketch from a photo this time...

of the little Fledgling Robin

(you can read the story on my Rather Be Blogging Blog here).

Cute and scruffy all in one.


My Magnolia Cards