Showing posts with label digital art. Show all posts

Friday, March 11, 2011

Happy Everything!


Here's another card I created using my new "Sweet Dreams" digistamps... this time using the mini-sized images to accompany my Mini Happy Tilda. This is a regular-sized card with a simple pink cadstock base. This time I wanted the card to be light but girlie; so I scored panels into a piece of white cardstock for Tilda's walls. I also added two strips of cardstock for the baseboard.


I coloured Tilda, the bed, nightstand, teddy, dresser, toy dog and toy cat with Copics and popped them all up on dimensional foam for added depth. A simple "Happy Everything" stamp was added and then to give it all a bit of sparkle, I used my new Martha Stewart Crystal Fine glitter on a Sizzix die cut under the sentiment.

I added the same glitter to the two hearts on the bed and dresser.


The ribbon is from my stash.

Here are the Copic colours used:

Tilda:  E000, E01, E02, Y21, C2, G000, G21, B21
Bed and Teddy:  R000, R20, R22, C0, C1, C2, C3
Toy Dog: E31 and E35
Toy Cat: N3 and N6

To get your own bedroom set for Tilda, head over to my DigiDrawn site to see it and other Magnolia scenarios HERE.


Thursday, March 3, 2011

Sweet Dreams


Finally! A new scene has been added to the Scenarios and Accessories section over at DigiDrawn.com!

One of my most requested images has been a bed for our dear Tilda (ever since I created one of my first Magnolia cards with Happy Tilda jumping on her bed). Well today I unveiled "Sweet Dreams", 2 sets of six images each scaled for both regular and mini Magnolia stamps. It includes the bed and nightstand (as seen above), a bed without the nightstand, matching dresser, a big comfy floor pillow and two new toys: a puppy and a kitten!

The sample card above was created using a 6 X 6 easel card as the base. The full size "Dreamy Tilda" fits perfectly on either the bed or pillow! I used a piece of clear plastic scored and shaped into an "L" to mount Tilda, the pillow and the toy cat to the base of the card with Scor-Tape. She folds flat when the card is closed, and holds the front when the card is opened!


The paper I chose for her bedroom wallpaper is Basic Grey's "Oh Baby! Girl". My Martha Stewart Doily Lace punch was used on the base, and Gold Stickles were added to Tilda's wings. Ribbon is from my stash and the sentiment is computer generated. I added three other of my digistamps to this card; the pink teddy bear, baby fox and fuzzy bunny have joined the fun in Tilda's room.

Copics used (whew, it's a long list!):

Tilda:  E0000, E00, E01, Y000, Y11, Y21, E11, E13, E15 and E17
Bed:  R30, R32, R35, R37, G20, G21, W3, C0, C1, C2, C3 and C4
Pillow:  G20, G21 and G28
Teddy on nightstand:  E30, E31, E33, E35 and E37
Nightstand:  C0, C1, C2, C3 and C4
Teddy on floor:  RV10, RV11 and C2
Bunny:  Y32, Y35, RV10 and C2
Fox:  YR02, YR07, C3, C6 and C10
Puppy:  RV13, B000, B02, C2, C6 and C10
Kitten:  RV11, C1, C2 and C4

So if you'd like this bedroom scene for your Tilda, head over to DigiDrawn HERE to order!

Tuesday, February 8, 2011

Tilda Writing Diary


Over at my DigiDrawn digital stamp site, I have been asking for ideas and a pile of books was one suggestion... so I thought they would go great with my Tilda Writing Diary stamp.

I have created two images in the set; one with ten books and a shorter stack of five books. You can use them together, separately, flipped, with Tilda or Edwin perched atop or beside them! The great thing about digistamps is you can also resize them to use with the adorable Mini Maggies too! These would be great for school images or to celebrate "I Love To Read Month" THIS month!


If you look closely, you'll notice my little special effect; I replaced Tilda's quill with a real feather. I simply cut down a feather I got at the Dollar Store (I bought a few bags of them when I did my Native American Tilda card - so they are going to last me a long time! Ha!). I cut two slots around Tilda's hand and slid the feather into place.

I'm amazed my cats never stole it before I taped it down  ;)

I can't recall the patterned paper I used, but with the script image it seemed to work. I matched the mats to the colours in the pattern and inked them with Memento Tuxedo Black ink. The green vine is made using Martha Stewart's Vine Trim punch.  The roses are from Wild Orchid, natch.

Funny story about the ribbon though. My family will confirm (with a huge sigh and rolling eyes, I must add) that I throw NOTHING away I think I will use again. This ribbon is proof of that. It is one of four long pieces I had kept when I bought some soft plush blankets for the chair in my craftroom. Each piece had two velcro ends so they would hold together when wrapped around the blankets... so I just clipped off the velcro on one piece and used my Bow Easy to make the bow. Another piece was wrapped around the card. I LOVE the thick width and the colour was perfect!


Here are the Copics used on Tilda (I used a whole variety of colours on the books and won't list them all here!):

Tilda skin:  E0000, E000, E00, E01
Hair:  E29, E50, E97, E99
Dress:  V000, V12, V15, N1, N3
Book:  B34, B37, W0, W3

If you want these books for your own creations, head over to my DigiDrawn site here!

Wednesday, February 2, 2011

Ribbon Wrapped Valentine


Just in time! I was doodling at my desk the other day (shhh! don't tell my boss that...) and came up with this ribbon-wrapped heart. Well, I DO work in Cardiac Sciences..... ahem.

With Valentine's Day coming up fast, I thought this should be my next digi stamp.

When daughter saw it coloured in, she commented that it almost looked like a tattoo! Yeah, I guess I can see that... my first card is on the "grungy" side.

Then I wondered how some Magnolia stamps would look with it too:


Hey! Not bad!

If you need a heart for YOUR Valentine cards, you can pick up this stamp over at DigiDrawn for only $ 2.50.

Other particulars about my first card can be found at DigiDrawn here.

Details on the second card:

Paper from my stash. I think the red is Basic Grey. The Wild Orchid roses are tinted with Copic Y28 and the Colorless Blender. A Martha Stewart leaf punch was used for the black leaves.

Copic colours used:

Tilda: E0000, E00, Y11, E97, C1, C3, G00, G03

Edwin: E0000, E00, E97, E99, C1, C3, B93, B95, B97

Heart: R20, R22, R27

Ribbon: Y00, Y21, Y28

Happy Heart Day!

Sunday, January 16, 2011

Two Cards in ONE Weekend!


Wow, what a busy weekend! In between the usual necessary chores, I was able to get two cards done. The one above was created to showcase my newest digi stamp "Chicken" that can be purchased at DigiDrawn here. It was a special request by a reader. So glad I was able to finish it up and do a sample card too! Details on how I made the card and coloured the image can be found over at DigiDrawn.

The next card is for a sadder occasion. Unfortunately a co-worker and friend lost her dog late last week to cancer. We are both animal lovers and I just know the heart wrenching pain she must be going through right now. Condolences cards are hard, but luckily I had some perfect paper and ribbon on hand:


I used my Cuttlebug to emboss the black background paper and also to cut the Sizzix dies for the swirls. A Martha Stewart punch (Double Loops) was used on the corners.

Monday, January 10, 2011

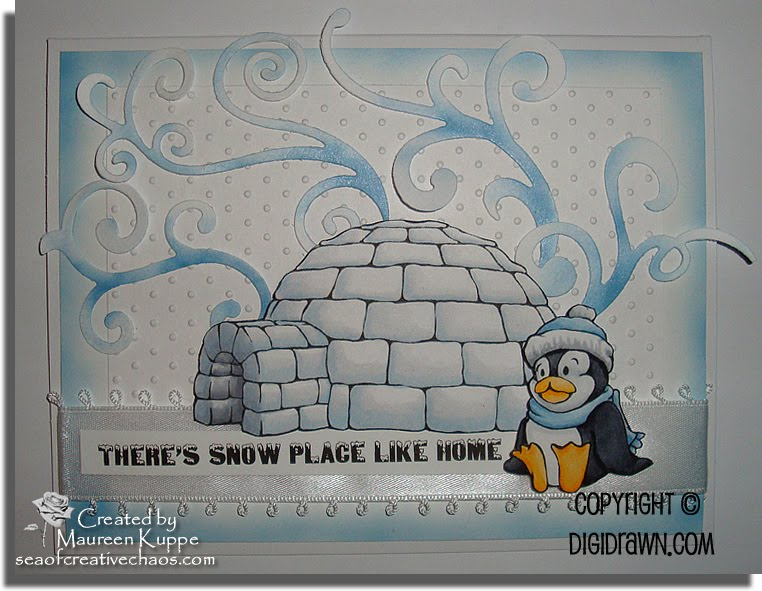
There's Snow Place Like Home!

Especially on a bitterly cold day! Brrrrr!

But I do LOVE winter; it gives me more time to craft instead of weeding a garden  ;)

Here's a card featuring my newest digistamps, Penguin and Igloo. They can be purchased over at my DigiDrawn site!


This card also marks the first time I've tried a new toy I received for Christmas - my Copic airbrush! I used it to colour the background and the swirls with B91 and B93.

My Cuttlebug was used to emboss the background as well as to cut my swirls using three new Sizzlet dies I picked up at Michaels for 50% off yesterday (can't beat that!)

The ribbon is from my stash and the sentiment is computer generated.

Copics used:

Penguin: B91, B93, B95, C0, C3, C4, C6, C10, Y32, Y35, Y38

Igloo: B91, C0, C3, C4, C5

Keep warm - stay indoors!

Tuesday, December 21, 2010

Christmas Cards 2010


Now that my cards have been sent out awhile ago, I can finally post what I did for this year's design, hopefully without ruining the surprise for the recipients.

First, I knew I wanted to use my own drawing of CranBeary bear (one of my digistamps over at my DigiDrawn site) as the focal image. Next I found my Sizzix Round Tag die and ran it through my Cuttlebug. When I looked at it closer, I realized it bore a good resemblance to a Christmas ornament, so I coloured it in that way, attached a real ornament hanger and hooked it over CranBeary's candy cane.

The paper used for the snowflake background is "Christmas Magic - Silver Snow" by Fancy Pants Design. A Martha Stewart snowflake punch was run along the bottom of the cardfront, and another Sizzix Scribbles Swirls die was used to punch out the green swirls, matching the cardstock for the background mat.

The longest part of the process was colouring in over 30 CranBearys in Copic markers and cutting them all out!


At least this year, I smartly chose an image that is mostly white!

Happy Holidays!

Saturday, August 8, 2009

Open For Business


I've finally done something I was asked to do last year... yes, I DO procrastinate, don't I?

What did I do?

Well, I finally opened some shops at CafePress, creating some products with my original artwork on them.

I doubt I shall get any many sales, but that's okay. The main reason I wanted to try it is to create some items for myself, and perhaps a few trinkets for future bloggy giveaways.

I'm going to add more with older artwork and some of my photographs... so we'll see how it goes. You can window shop here:

MAUREEN'S GALLERIES AT CAFE PRESS


Thursday, January 3, 2008

A New Year, A New Obsession


And so it begins... I've discovered yet another vice to squeeze into my already full life. I guess it's not enough that I am a wife, mother, full-time employee, collector, scrapbooker, pet owner, avid reader, webmaster and blogger. Nope.

Now I can add Digital Painter to that list.

Here is my second piece that I finished on my Wacom tonight, after three days work. Not counting the time spent doing my other family duties (which unfortunately haven't miraculously disappeared), I would guess that I worked on this a few hours per day. So this took about 6 - 8 hours total.

And in the true form of obsessive behaviour, I am already planning the next project in my head.

Sunday, December 30, 2007

New Toys

It doesn't matter that I am 47... like a little kid I still love to play with the new treasures that Santa brought me.

Here is the toy I happily discovered this Christmas morning: a the Wacom Bamboo graphics tablet. I've read that if you're going to get a tablet and you're not really a professional graphic artist, Wacom is the way to go. But they are hard to get, at least up here in Canada, so I really doubted I would be lucky enough to get this puppy:

Wacom Bamboo

The best part about being off work for two weeks (yay!) is that I get some time between meals, dishes, laundry, house cleaning, and taking care of the sick and infirm (actually all are on the mend now, thank goodness), to draw and digitally paint.

Here is my first attempt using the tablet. Of course I had to choose the furriest creature in the house (what the heck was I thinking?):

Tawnee Painting

Now that the laundry is done and I have another week off work, you know what I'm going to be doing for the next few days -- continuing to learn the features of the tablet and software and paint, paint, paint.

At least I don't have to worry about cleaning up after THIS.

My Magnolia Cards